How to use eSIM on your iPhone through Yoigo

For several years now, Apple has introduced an alternative way to use mobile networks without the need for a physical SIM card. Unfortunately, users from other parts of the world have had to wait a long time to be able to use it on their iPhone phones , although in the case of Spain it is already viable to take advantage of the so-called eSIM thanks to Yoigo .
As was already the case with Orange during 2018 , this time it is Yoigo who facilitates the use of an eSIM or virtual SIM, a format that is already integrated into the Apple device and only needs the user to activate it. Through the scanning of a QR code it is possible to connect in seconds to the network of the contracted operator , something that facilitates the portability process and helps to have more than one number on the same phone.
Tutorial for eSIM with Yoigo operator: How to use eSIM on your iPhone through Yoigo

Steps to follow to activate eSIM on iPhone
It should be made clear that the availability of Yoigo’s eSIM has compatibility with the latest devices from the Cupertino giant, that is, the iPhone XR, iPhone XS and iPhone XS Max, with an operating system updated to iOS 12.1 or higher.
In the first instance, the eSIM must be requested, by which Yoigo will send an email to the user with the necessary data for activation , that is, a QR code, the PIN and the PUK of the SIM . Keep in mind that you will need an alternative device (computer, tablet or mobile) to be able to show the code, or failing that, have it printed, while you will need to be connected at all times to a WiFi network to guarantee connection to Internet in the process.
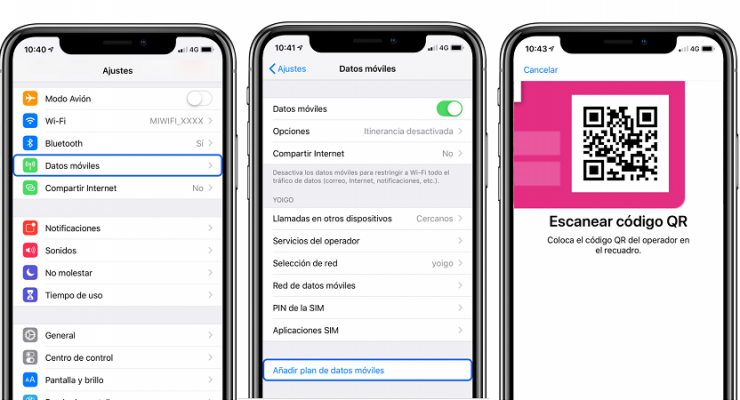
Thus, the initial step consists of entering “Settings> Mobile data” , and once inside, click on the option “Add mobile data plan”.
Next, you have to scan the QR code that Yoigo has previously sent , although if for some reason it does not work, you can always enter the data manually by clicking on the link that will be found on that screen.
The third step is to confirm the activation of the scan by entering the PIN code that appears next to the QR that was initially sent. Remember that, for security reasons, each QR code is valid only for one use, so when modifying the device line or if you need to reinstall the eSIM, you will have to request a new code from the operator.
Finally, all you have to do is accept the confirmation message that will appear on the screen and the eSIM will already be correctly configured. If the eSIM replaces a physical SIM, the latter must be removed from the device , while to configure a second line it is necessary to make use of the Dual SIM behavior function of Apple devices (more information from here ).


